
La humedad en las paredes puede ser un problema persistente y molesto, afectando tanto la estética de tu hogar como tu salud. Afortunadamente, hay soluciones efectivas para abordar este problema de raíz y restaurar la belleza de tus espacios.
Descubre cómo mantener tus paredes impecables y libres de humedad con métodos sencillos y eficaces que te permitirán disfrutar de un hogar más confortable y saludable, eliminando ese problema que afecta tu día a día.
Este método ofrece una solución rápida y eficaz para deshacerte de la sal y la humedad que deterioran tus paredes.
Embellece tus espacios al restaurar tus paredes a su estado original, mejorando la estética y el valor de tu hogar.
Además de mejorar la apariencia, esta solución contribuye a un ambiente más saludable al eliminar el moho y los alérgenos.
Este proceso es versátil y se adapta a diferentes tipos de paredes, asegurando una solución efectiva para cualquier hogar.
Materials for Esto elimina rápidamente la sal y la humedad de las paredes.
Here’s what you’ll need to create this beautiful home project:
The complete materials list, including measurements, is provided in the project details below.
How to Create Esto elimina rápidamente la sal y la humedad de las paredes.
Follow these simple steps to create this beautiful home project:
Step 1: Preparación del área
Comienza por proteger el suelo y los muebles cercanos con plástico o papel. Asegúrate de ventilar bien la habitación abriendo ventanas y puertas. Usa guantes, mascarilla y gafas de seguridad para protegerte.
Step 2: Limpieza inicial
Utiliza el cepillo de alambre y la espátula para raspar y eliminar las capas sueltas de pintura, yeso y salitre de la pared. Aspira la superficie con el accesorio de cepillo para eliminar el polvo y los residuos.
Step 3: Limpieza profunda
Limpia la pared con agua y jabón neutro para eliminar cualquier residuo de suciedad. Si hay moho presente, aplica una solución de lejía diluida y deja actuar durante 10-15 minutos antes de enjuagar con agua limpia. Asegúrate de secar completamente la pared antes de continuar.
Step 4: Aplicación del sellador anti-humedad
Aplica una capa uniforme de sellador anti-humedad en toda la superficie de la pared con un rodillo o brocha. Sigue las instrucciones del fabricante para obtener los mejores resultados. Deja secar el sellador durante el tiempo recomendado.
Step 5: Pintura anti-humedad
Aplica dos capas de pintura anti-humedad en la pared, dejando secar cada capa según las instrucciones del fabricante. Utiliza un rodillo para cubrir áreas grandes y una brocha para los bordes y esquinas.
Step 6: Finalización
Una vez que la pintura esté completamente seca, retira el plástico o papel protector y limpia cualquier residuo. Disfruta de tus paredes renovadas y protegidas contra la humedad.
Consejos Adicionales para el Mantenimiento de tus Paredes (formated as H2 subheading)
Para mantener tus paredes libres de humedad a largo plazo, es crucial identificar y solucionar la causa subyacente del problema. La humedad puede provenir de fugas en tuberías, filtraciones desde el exterior, condensación o una ventilación deficiente. Inspecciona regularmente tus paredes en busca de signos de humedad, como manchas, moho o descamación de la pintura.
Identificación de la Fuente de Humedad (formated as H3 subheading)
Si sospechas de una fuga en una tubería, contacta a un fontanero profesional para que la repare. Si la humedad proviene del exterior, revisa el estado de las paredes exteriores y asegúrate de que no haya grietas o fisuras por donde pueda filtrarse el agua. Sella cualquier grieta con un sellador adecuado y considera impermeabilizar las paredes exteriores para protegerlas de la lluvia.
Mejorar la Ventilación (formated as H3 subheading)
La condensación es otra causa común de humedad en las paredes, especialmente en baños y cocinas. Para reducir la condensación, asegúrate de que estas áreas estén bien ventiladas. Abre las ventanas después de ducharte o cocinar, y considera instalar un extractor de aire para eliminar el exceso de humedad. También puedes utilizar deshumidificadores para reducir la humedad en el aire.
Productos y Tratamientos Preventivos (formated as H3 subheading)
Además de las medidas mencionadas, existen productos y tratamientos preventivos que pueden ayudarte a proteger tus paredes de la humedad. Los aditivos anti-moho para la pintura pueden prevenir el crecimiento de moho en las paredes. También puedes aplicar un revestimiento hidrófugo en las paredes para repeler el agua y prevenir la humedad.
Soluciones Naturales para Combatir la Humedad (formated as H2 subheading)
Aunque los productos químicos pueden ser efectivos, también existen soluciones naturales para combatir la humedad en las paredes. Estas opciones son más respetuosas con el medio ambiente y pueden ser una buena alternativa si prefieres evitar los productos químicos.
Uso de Plantas Absorbentes de Humedad (formated as H3 subheading)
Algunas plantas tienen la capacidad de absorber la humedad del aire, lo que puede ayudar a reducir la humedad en las paredes. Algunas de las plantas más efectivas para este propósito son la hiedra inglesa, el lirio de la paz, la palma de bambú y el helecho de Boston. Coloca estas plantas en áreas húmedas de tu hogar para ayudar a absorber el exceso de humedad.
Bicarbonato de Sodio y Vinagre Blanco (formated as H3 subheading)
El bicarbonato de sodio y el vinagre blanco son dos ingredientes naturales que pueden ayudarte a combatir el moho y la humedad en las paredes. Para eliminar el moho, mezcla bicarbonato de sodio con agua hasta formar una pasta y aplícala en las áreas afectadas. Deja actuar durante 10-15 minutos y luego frota con un cepillo. Para limpiar las paredes, mezcla vinagre blanco con agua en partes iguales y rocía la solución sobre las paredes. Deja actuar durante unos minutos y luego limpia con un paño húmedo.
Carbón Activado (formated as H3 subheading)
El carbón activado es otro absorbente natural de humedad que puedes utilizar para proteger tus paredes. Coloca bolsas de carbón activado en áreas húmedas de tu hogar para absorber el exceso de humedad del aire. Reemplaza el carbón activado cada pocos meses para mantener su efectividad.
Conclusión: Un Hogar Seco y Saludable (formated as H2 subheading)
Mantener tus paredes libres de humedad es fundamental para crear un hogar saludable y confortable. Esto elimina rápidamente la sal y la humedad de las paredes, pero es crucial identificar y solucionar la causa subyacente del problema para evitar que vuelva a aparecer. Con los consejos y técnicas compartidos en este artículo, puedes proteger tus paredes de la humedad y disfrutar de un hogar más seco y saludable durante muchos años. No dudes en experimentar con diferentes soluciones y encontrar la que mejor se adapte a tus necesidades y presupuesto. ¡Tu hogar te lo agradecerá!
Perfecting the Home Project Process
To achieve flawless results, proper planning is key. Gather all your materials beforehand and create a clear, step-by-step plan. This methodical approach helps prevent errors and ensures each stage is completed efficiently, leading to a professional finish you’ll be proud of.
Add Your Personal Touch
Don’t be afraid to express your unique style! Consider incorporating custom colors, decorative accents, or personalized touches that reflect your personality and complement your existing home décor. These small additions will make your project truly one-of-a-kind and special.
Caring for Your Creation
Protect your hard work by following a regular maintenance routine. Simple cleaning and preventative measures will safeguard the longevity and beauty of your project. Regular care ensures your efforts continue to enhance your home for years to come.
Plan ahead: Thorough preparation will streamline your project and minimize unexpected issues.
Choose quality materials: Investing in durable materials enhances the longevity and appearance of your work.
Don’t rush: Taking your time ensures better results and reduces the likelihood of errors.
(Personal anecdote formated as paragraph subheading (very important! don’t write any title for this paragraph))
I remember when my neighbor, Elena, saw my newly painted fence. She was amazed and asked for my secret! It was simply the preparation and quality paint.
Combating Moisture and Salts in Walls: A Comprehensive Guide
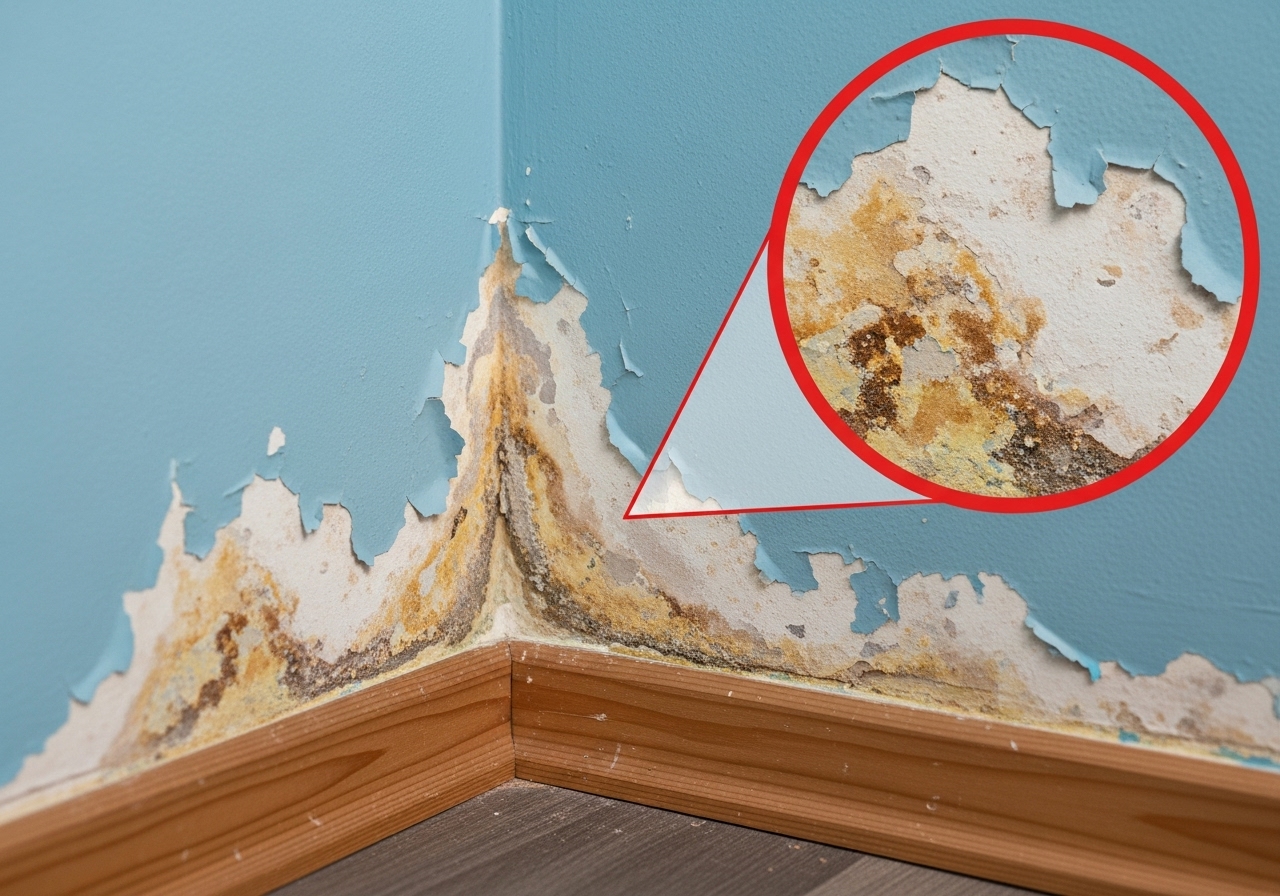
Dampness and saltpeter can be a real headache for homeowners. They not only ruin the appearance of walls, but can also compromise the structure of the building and affect the health of its inhabitants. Luckily, there are effective methods to combat these problems. Esto elimina rápidamente la sal y la humedad de las paredes, but it requires a consistent and well-planned approach. In this article, we’ll explore practical and effective techniques to tackle moisture and salt issues, ensuring your walls remain healthy and looking their best.
Understanding the Enemy: Identifying the Causes of Dampness and Salts
Before diving into solutions, it’s crucial to understand what causes these problems. Dampness can stem from various sources: rising damp from the ground, leaks in roofs or pipes, condensation due to poor ventilation, or even external factors like rain penetration. Salts, often appearing as a white powder on walls, are usually transported by water and deposited on the surface as the water evaporates. Identifying the source of moisture is the first step towards effective treatment. Ignoring this crucial step can result in recurring problems.
Preparation is Key: Gathering Your Arsenal
Like any good battle plan, you need the right tools and materials. You’ll likely need a wire brush, scraper, sandpaper, cleaning solutions designed to remove salts, waterproof sealant, paint suitable for damp environments, and protective gear like gloves and a mask. Having everything organized before you start saves time and frustration.
Step-by-Step: The Battle Plan Against Dampness and Salts
1. Surface Preparation: Begin by removing any loose paint or plaster with a scraper. Use a wire brush to eliminate salt efflorescence. Sand down the surface to create a smooth base for subsequent treatments.
2. Cleaning: Wash the affected area with a specialized salt-neutralizing cleaner. Follow the manufacturer’s instructions carefully. This step is essential to remove existing salts and prevent them from resurfacing.
3. Waterproofing: Apply a waterproof sealant to the cleaned surface. This creates a barrier that prevents moisture from penetrating the wall. Choose a high-quality sealant designed for interior or exterior use, depending on the location of the problem.
4. Painting: Once the sealant is dry, apply a coat of primer suitable for damp environments, followed by two coats of paint. Use a paint specifically designed to resist moisture and mold. This not only protects the wall but also improves its appearance.
DIY Solutions vs. Professional Help: When to Call in the Reinforcements
While many small-scale dampness and salt issues can be resolved with DIY methods, more severe problems might require professional intervention. If you suspect structural damage, rising damp affecting a large area, or persistent leaks, it’s best to consult a qualified building surveyor or damp proofing specialist. They can accurately diagnose the issue and recommend the appropriate solution, which may involve injecting a damp-proof course or addressing structural repairs. Remember that some solutions require specialized equipment and training.
Long-Term Strategies: Preventing Future Invasions
The best defense is a good offense. Implement strategies to prevent dampness and salts from returning. Ensure proper ventilation in bathrooms and kitchens. Fix any leaks promptly. Improve drainage around the building’s foundation. Consider using dehumidifiers in damp areas. Regularly inspect walls for signs of moisture or salt efflorescence.
Advanced Techniques for Stubborn Cases
Sometimes, the standard approach isn’t enough, and you need to bring out the big guns. For example, if the salt damage is extensive, consider removing the affected plaster entirely and replacing it with a salt-resistant plaster. In areas with high humidity, investigate installing a whole-house ventilation system to reduce moisture levels.
Choosing the Right Products: A Buyer’s Guide
Selecting the appropriate products is crucial for the success of your project. Look for cleaning solutions specifically designed to neutralize salts. Opt for waterproof sealants that offer long-term protection and are compatible with the surface you’re treating. Choose paints that are breathable, allowing moisture to escape while preventing further water penetration. Always read product reviews and consult with experts at your local hardware store to ensure you’re making the right choices.
Safety First: Protecting Yourself During the Process
Working with chemicals and potentially moldy environments requires prioritizing safety. Always wear gloves, a mask, and eye protection when cleaning and applying treatments. Ensure adequate ventilation in the work area. Dispose of used materials properly. If you’re unsure about any aspect of the process, consult with a professional.
Monitoring Your Progress: Keeping an Eye on the Situation
After completing the treatment, monitor the affected area regularly for any signs of recurring dampness or salt efflorescence. If the problem persists, reassess your approach and consider seeking professional advice. Addressing issues promptly prevents them from escalating.
Alternative Solutions: Natural and Eco-Friendly Approaches
For those seeking more natural solutions, consider using borax-based cleaners to remove mold and mildew. Improve ventilation naturally by opening windows and using fans. Plant moisture-absorbing plants, like ferns, in affected areas. While these methods may not be as potent as chemical treatments, they offer a safer and more environmentally friendly alternative.
Troubleshooting Common Problems: A Q&A Guide
Q: The salt keeps coming back even after cleaning. What should I do?
A: This indicates that the source of moisture hasn’t been addressed. Identify and fix the underlying cause, such as a leaky pipe or rising damp.
Q: The paint is peeling even after using a waterproof sealant. Why?
A: The sealant might not be compatible with the paint, or the surface may not have been properly prepared. Ensure the sealant is fully dry before painting, and use a primer specifically designed for damp environments.
Q: How can I prevent condensation in my bathroom?
A: Improve ventilation by installing an exhaust fan or opening a window after showering. Wipe down wet surfaces to reduce moisture buildup.
The Satisfaction of a Job Well Done
Dealing with dampness and salts in walls can be challenging, but with the right knowledge and techniques, it’s a battle you can win. The satisfaction of seeing your walls restored to their former glory and knowing that you’ve protected your home from further damage is well worth the effort. Remember that ongoing maintenance and prevention are key to keeping these issues at bay. Esto elimina rápidamente la sal y la humedad de las paredes when the appropriate strategy is applied.
Conclusion for Esto elimina rápidamente la sal y la humedad de las paredes. :
Para resumir, eliminar la sal y la humedad de las paredes implica identificar la fuente del problema, eliminar la sal visible con un cepillo, y aplicar un producto específico. Recuerda que la ventilación es crucial durante el proceso. Pequeños cambios como sellar ventanas y cambiar bombillas pueden marcar una gran diferencia en la eficiencia energética de su hogar. Para los principiantes en jardinería, las suculentas y las hierbas aromáticas son excelentes opciones para empezar. Con planificación y creatividad, es posible remodelar un baño con un presupuesto ajustado.
FAQs :
¿Cómo puedo mejorar la eficiencia energética de mi hogar de forma sencilla?
Una manera fácil de mejorar la eficiencia energética es sellar grietas y hendiduras alrededor de ventanas y puertas. Use burletes o masilla para evitar filtraciones de aire. Instalar un termostato programable también ayuda a controlar la temperatura y reducir el consumo de energía. Cambie las bombillas incandescentes por luces LED, que consumen mucha menos energía y duran más. Aislar adecuadamente el ático y las paredes es una inversión valiosa que reducirá significativamente sus facturas de energía a largo plazo.
¿Qué plantas son ideales para principiantes en la jardinería?
Para los jardineros principiantes, algunas plantas son más fáciles de cuidar que otras. Las suculentas, como el aloe vera y la echeveria, requieren poco riego y son resistentes. Las hierbas aromáticas como la menta, el orégano y el romero son igualmente fáciles de cultivar en macetas o en el jardín. Las flores como las caléndulas y los girasoles son resistentes y producen flores coloridas durante toda la temporada. Comience con estas opciones sencillas para ganar confianza y experiencia.
¿Cómo puedo abordar un proyecto de bricolaje de remodelación del baño con poco presupuesto?
Remodelar un baño con poco presupuesto es posible con algunas estrategias inteligentes. En lugar de reemplazar los azulejos, considere pintarlos o usar adhesivos de vinilo para darles un aspecto renovado. Cambiar los accesorios como grifos y cabezales de ducha por modelos más modernos puede marcar una gran diferencia. Actualice la iluminación instalando nuevas lámparas o cambiando las bombillas. Pintar las paredes con un color fresco también es una forma económica de transformar el espacio.
¿Cómo se elimina la acumulación de sal y humedad de las paredes de forma segura?
La acumulación de sal y humedad en las paredes es un problema común, pero se puede abordar. Primero, identifique y repare la fuente de la humedad, como fugas en las tuberías o problemas de impermeabilización. Use un cepillo de cerdas duras para eliminar suavemente la sal visible. Aplique un producto especializado para eliminar la sal y la humedad, siguiendo cuidadosamente las instrucciones del fabricante. Asegúrese de ventilar bien el área mientras trabaja y use equipo de protección, como guantes.